Adding Numbered Page Navigation to Blogger
Add Widgets in simple Steps...
1. Add CSS
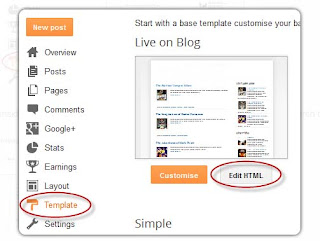
Step 1. Go to Blogger Dashboard > Templete > Click on Edit HTML Button.
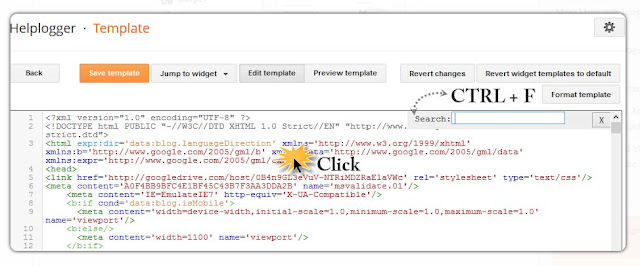
Step 2. Click anywhere inside the HTML Code area and press the CTRL + F key to search box like the pic below.
Type or paste the following tag inside search box then hit enter find it.....
]]></b:skin>
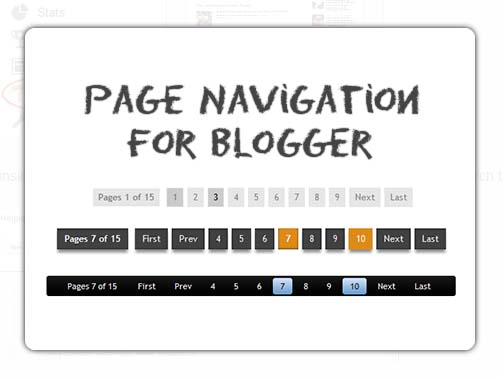
Now Choose one of the page navigation model for your blog Then copy the code just below the Navigation model and paste the code just above ]]></b:skin> Then Save Template.
Model 1
#blog-pager{clear:both;margin:30px auto;text-align:center; padding: 7px;}
.blog-pager {background: none;}
.displaypageNum a,.showpage a,.pagecurrent{padding: 5px 10px;margin-right:5px; color: #F4F4F4; background-color:#404042;-webkit-box-shadow: 0px 5px 3px -1px rgba(50, 50, 50, 0.53);-moz-box-shadow:0px 5px 3px -1px rgba(50, 50, 50, 0.53);box-shadow: 0px 5px 3px -1px rgba(50, 50, 50, 0.53);}
.displaypageNum a:hover,.showpage a:hover, .pagecurrent{background:#EC8D04;text-decoration:none;color: #fff;}
#blog-pager .showpage, #blog-pager, .pagecurrent{font-weight:bold;color: #000;}
.showpageOf{display:none!important}
#blog-pager .pages{border:none;-webkit-box-shadow: 0px 5px 3px -1px rgba(50, 50, 50, 0.53);-moz-box-shadow:0px 5px 3px -1px rgba(50, 50, 50, 0.53);box-shadow: 0px 5px 3px -1px rgba(50, 50, 50, 0.53);}
Model 2
#blog-pager{clear:both;margin:30px auto;text-align:center; padding: 7px; }
.blog-pager {background: none;}
.displaypageNum a,.showpage a,.pagecurrent{font-size: 12px;padding: 5px 12px;margin-right:5px; color: #222; background-color:#eee; border: 1px solid #EEEEEE;}
.displaypageNum a:hover,.showpage a:hover, .pagecurrent{background:#E5E5E5;text-decoration:none;color: #222;}
#blog-pager .pagecurrent{font-weight:bold;color: #fff;background:#DB4920;}
.showpageOf{display:none!important}
#blog-pager .pages{border:none;}
Model 3
#blog-pager{clear:both;margin:30px auto; padding: 7px; text-align:center;font-size: 11px;background-image: -webkit-gradient(linear,left bottom,left top,color-stop(0, #000000),color-stop(1, #292929));background-image: -o-linear-gradient(top, #000000 0%, #292929 100%);background-image: -moz-linear-gradient(top, #000000 0%, #292929 100%);background-image: -webkit-linear-gradient(top, #000000 0%, #292929 100%);background-image: -ms-linear-gradient(top, #000000 0%, #292929 100%);background-image: linear-gradient(to top, #000000 0%, #292929 100%); padding: 6px;-webkit-border-radius: 3px;-moz-border-radius: 3px;border-radius: 3px;}
.blog-pager {background: none;}
.displaypageNum a,.showpage a,.pagecurrent{padding: 3px 10px;margin-right:5px; color: #fff;}
.displaypageNum a:hover,.showpage a:hover,.pagecurrent{background-image: -webkit-gradient(linear,left bottom,left top,color-stop(0, #59A2CF),color-stop(1, #D9EAFF));background-image: -o-linear-gradient(top, #59A2CF 0%, #D9EAFF 100%);background-image: -moz-linear-gradient(top, #59A2CF 0%, #D9EAFF 100%);background-image: -webkit-linear-gradient(top, #59A2CF 0%, #D9EAFF 100%);background-image: -ms-linear-gradient(top, #59A2CF 0%, #D9EAFF 100%);background-image: linear-gradient(to top, #59A2CF 0%, #D9EAFF 100%);text-decoration: none;color: #000;-webkit-border-radius: 3px;-moz-border-radius: 3px;border-radius: 3px;}
.showpageOf{display:none!important}.blog-pager-older-link, .home-link, .blog-pager-newer-link {background: transparent;}
a.blog-pager-older-link, a.home-link, a.blog-pager-newer-link {color: #fff;}
#blog-pager .pages{border:none;background: none;}
Model 4
#blog-pager{clear:both;margin:30px auto;text-align:center; padding: 7px;}
.blog-pager {background: none;}
.displaypageNum a,.showpage a,.pagecurrent{font-size: 14px;padding: 5px 12px;margin-right:5px; color: #666; background-color:#eee;}
.displaypageNum a:hover,.showpage a:hover, .pagecurrent{background:#359BED;text-decoration:none;color: #fff;}
#blog-pager .pagecurrent{font-weight:bold;color: #fff;background:#359BED;}
.showpageOf{display:none!important}
#blog-pager .pages{border:none;}
Model 5
#blog-pager{clear:both;margin:30px auto;text-align:center; padding: 7px; }
.blog-pager {background: none;}
.displaypageNum a,.showpage a,.pagecurrent{font-size: 13px;padding: 5px 12px;margin-right:5px; color: #3E5801; background-color:#E0EDC1;}
.displaypageNum a:hover,.showpage a:hover, .pagecurrent{background:#FEF6DF;text-decoration:none;color: #E16800;}
#blog-pager .pagecurrent{font-weight:bold;color: #D25E71;background:#FFDEDF;}
.showpageOf{display:none!important}
#blog-pager .pages{border:none;}
Model 6
#blog-pager{clear:both;margin:30px auto;text-align:center; padding: 7px; }
.blog-pager {background: none;}
.displaypageNum a,.showpage a,.pagecurrent{font-size: 13px;padding: 5px 12px;margin-right:5px; color: #AD0B00; background-color:#FAB001;}
.displaypageNum a:hover,.showpage a:hover, .pagecurrent{background:#DB4920;text-decoration:none;color: #fff;}
#blog-pager .pagecurrent{font-weight:bold;color: #fff;background:#DB4920;}
.showpageOf{display:none!important}
#blog-pager .pages{border:none;}
Model 7
#blog-pager{clear:both;margin:30px auto;text-align:center; padding: 7px; }
.blog-pager {background: none;}
.displaypageNum a,.showpage a,.pagecurrent{font-size: 12px;padding: 5px 12px;margin-right:5px; color: #222; background-color:#eee; border: 1px solid #EEEEEE;}
.displaypageNum a:hover,.showpage a:hover, .pagecurrent{background:#E5E5E5;text-decoration:none;color: #222;}
#blog-pager .pagecurrent{font-weight:bold;color: #fff;background:#DB4920;}
.showpageOf{display:none!important}
#blog-pager .pages{border:none;}
2. Add CSS Script
Step 4. Click anywhere inside the HTML Code area and press the CTRL + F key to find
</body>
Step 5. Add the following script just above it.
<b:if cond='data:blog.pageType != "item"'>
<b:if cond='data:blog.pageType != "static_page"'>
<script type='text/javascript'>
/*<![CDATA[*/
var perPage=7;
var numPages=6;
var firstText ='First';
var lastText ='Last';
var prevText ='« Previous';
var nextText ='Next »';
var urlactivepage=location.href;
var home_page="/";
/*]]>*/
</script>
<script src="http://helplogger.googlecode.com/svn/trunk/page-navigation2.js"/>
</b:if>
</b:if>
Step 6. Then Save Template
Enjoy!
Add Widgets in simple Steps...
- Add CSS
- Add Script.
1. Add CSS
Step 1. Go to Blogger Dashboard > Templete > Click on Edit HTML Button.
Step 2. Click anywhere inside the HTML Code area and press the CTRL + F key to search box like the pic below.
Type or paste the following tag inside search box then hit enter find it.....
]]></b:skin>
Now Choose one of the page navigation model for your blog Then copy the code just below the Navigation model and paste the code just above ]]></b:skin> Then Save Template.
Model 1
#blog-pager{clear:both;margin:30px auto;text-align:center; padding: 7px;}
.blog-pager {background: none;}
.displaypageNum a,.showpage a,.pagecurrent{padding: 5px 10px;margin-right:5px; color: #F4F4F4; background-color:#404042;-webkit-box-shadow: 0px 5px 3px -1px rgba(50, 50, 50, 0.53);-moz-box-shadow:0px 5px 3px -1px rgba(50, 50, 50, 0.53);box-shadow: 0px 5px 3px -1px rgba(50, 50, 50, 0.53);}
.displaypageNum a:hover,.showpage a:hover, .pagecurrent{background:#EC8D04;text-decoration:none;color: #fff;}
#blog-pager .showpage, #blog-pager, .pagecurrent{font-weight:bold;color: #000;}
.showpageOf{display:none!important}
#blog-pager .pages{border:none;-webkit-box-shadow: 0px 5px 3px -1px rgba(50, 50, 50, 0.53);-moz-box-shadow:0px 5px 3px -1px rgba(50, 50, 50, 0.53);box-shadow: 0px 5px 3px -1px rgba(50, 50, 50, 0.53);}
Model 2
#blog-pager{clear:both;margin:30px auto;text-align:center; padding: 7px; }
.blog-pager {background: none;}
.displaypageNum a,.showpage a,.pagecurrent{font-size: 12px;padding: 5px 12px;margin-right:5px; color: #222; background-color:#eee; border: 1px solid #EEEEEE;}
.displaypageNum a:hover,.showpage a:hover, .pagecurrent{background:#E5E5E5;text-decoration:none;color: #222;}
#blog-pager .pagecurrent{font-weight:bold;color: #fff;background:#DB4920;}
.showpageOf{display:none!important}
#blog-pager .pages{border:none;}
Model 3
#blog-pager{clear:both;margin:30px auto; padding: 7px; text-align:center;font-size: 11px;background-image: -webkit-gradient(linear,left bottom,left top,color-stop(0, #000000),color-stop(1, #292929));background-image: -o-linear-gradient(top, #000000 0%, #292929 100%);background-image: -moz-linear-gradient(top, #000000 0%, #292929 100%);background-image: -webkit-linear-gradient(top, #000000 0%, #292929 100%);background-image: -ms-linear-gradient(top, #000000 0%, #292929 100%);background-image: linear-gradient(to top, #000000 0%, #292929 100%); padding: 6px;-webkit-border-radius: 3px;-moz-border-radius: 3px;border-radius: 3px;}
.blog-pager {background: none;}
.displaypageNum a,.showpage a,.pagecurrent{padding: 3px 10px;margin-right:5px; color: #fff;}
.displaypageNum a:hover,.showpage a:hover,.pagecurrent{background-image: -webkit-gradient(linear,left bottom,left top,color-stop(0, #59A2CF),color-stop(1, #D9EAFF));background-image: -o-linear-gradient(top, #59A2CF 0%, #D9EAFF 100%);background-image: -moz-linear-gradient(top, #59A2CF 0%, #D9EAFF 100%);background-image: -webkit-linear-gradient(top, #59A2CF 0%, #D9EAFF 100%);background-image: -ms-linear-gradient(top, #59A2CF 0%, #D9EAFF 100%);background-image: linear-gradient(to top, #59A2CF 0%, #D9EAFF 100%);text-decoration: none;color: #000;-webkit-border-radius: 3px;-moz-border-radius: 3px;border-radius: 3px;}
.showpageOf{display:none!important}.blog-pager-older-link, .home-link, .blog-pager-newer-link {background: transparent;}
a.blog-pager-older-link, a.home-link, a.blog-pager-newer-link {color: #fff;}
#blog-pager .pages{border:none;background: none;}
Model 4
#blog-pager{clear:both;margin:30px auto;text-align:center; padding: 7px;}
.blog-pager {background: none;}
.displaypageNum a,.showpage a,.pagecurrent{font-size: 14px;padding: 5px 12px;margin-right:5px; color: #666; background-color:#eee;}
.displaypageNum a:hover,.showpage a:hover, .pagecurrent{background:#359BED;text-decoration:none;color: #fff;}
#blog-pager .pagecurrent{font-weight:bold;color: #fff;background:#359BED;}
.showpageOf{display:none!important}
#blog-pager .pages{border:none;}
Model 5
#blog-pager{clear:both;margin:30px auto;text-align:center; padding: 7px; }
.blog-pager {background: none;}
.displaypageNum a,.showpage a,.pagecurrent{font-size: 13px;padding: 5px 12px;margin-right:5px; color: #3E5801; background-color:#E0EDC1;}
.displaypageNum a:hover,.showpage a:hover, .pagecurrent{background:#FEF6DF;text-decoration:none;color: #E16800;}
#blog-pager .pagecurrent{font-weight:bold;color: #D25E71;background:#FFDEDF;}
.showpageOf{display:none!important}
#blog-pager .pages{border:none;}
Model 6
#blog-pager{clear:both;margin:30px auto;text-align:center; padding: 7px; }
.blog-pager {background: none;}
.displaypageNum a,.showpage a,.pagecurrent{font-size: 13px;padding: 5px 12px;margin-right:5px; color: #AD0B00; background-color:#FAB001;}
.displaypageNum a:hover,.showpage a:hover, .pagecurrent{background:#DB4920;text-decoration:none;color: #fff;}
#blog-pager .pagecurrent{font-weight:bold;color: #fff;background:#DB4920;}
.showpageOf{display:none!important}
#blog-pager .pages{border:none;}
Model 7
#blog-pager{clear:both;margin:30px auto;text-align:center; padding: 7px; }
.blog-pager {background: none;}
.displaypageNum a,.showpage a,.pagecurrent{font-size: 12px;padding: 5px 12px;margin-right:5px; color: #222; background-color:#eee; border: 1px solid #EEEEEE;}
.displaypageNum a:hover,.showpage a:hover, .pagecurrent{background:#E5E5E5;text-decoration:none;color: #222;}
#blog-pager .pagecurrent{font-weight:bold;color: #fff;background:#DB4920;}
.showpageOf{display:none!important}
#blog-pager .pages{border:none;}
2. Add CSS Script
Step 4. Click anywhere inside the HTML Code area and press the CTRL + F key to find
</body>
Step 5. Add the following script just above it.
<b:if cond='data:blog.pageType != "item"'>
<b:if cond='data:blog.pageType != "static_page"'>
<script type='text/javascript'>
/*<![CDATA[*/
var perPage=7;
var numPages=6;
var firstText ='First';
var lastText ='Last';
var prevText ='« Previous';
var nextText ='Next »';
var urlactivepage=location.href;
var home_page="/";
/*]]>*/
</script>
<script src="http://helplogger.googlecode.com/svn/trunk/page-navigation2.js"/>
</b:if>
</b:if>
Step 6. Then Save Template
Enjoy!


Blogger Comment
Facebook Comment